Interactive features make gaming more immersive than ever. Among these, voice chat in Roblox enhances gameplay by enabling real-time communication. If you’re wondering how to turn on Roblox voice chat, the process involves a few essential steps, some requirements, and settings adjustments.
Begin by ensuring eligibility. Roblox voice chat—also known as spatial voice—is only available to users aged 13 or older. This requirement exists to help safeguard younger players and maintain community standards. Age verification is mandatory before access is granted.
Open a web browser and navigate to the official Roblox website. Sign in using your username and password. Once inside your account, locate the gear-shaped icon near the top-right corner. This symbol represents your Settings menu.
Click it, and a dropdown will appear. From there, select the Settings option to view your account configuration. Within this section, locate the Account Info tab. This is where you’ll find age-related information, including whether your birthday meets the required threshold for voice features.
To proceed, identity verification must be completed. Scroll down until you see a prompt offering the option to verify your identity. Click the Verify My Age button. The system will ask for permission to launch a secure process using your device’s camera.
Follow the prompts carefully. You’ll be asked to upload a government-issued ID, such as a passport, license, or national card. Additionally, a live selfie will be required. This step matches your facial image to the submitted document using AI-powered authentication.
Successful verification typically happens within a few minutes. Once accepted, the system automatically unlocks access to voice-enabled features. If the process fails, double-check lighting conditions or clarity of submitted images before trying again.
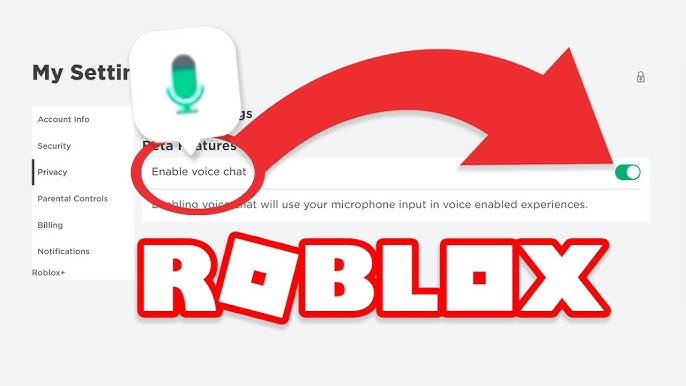
Next, return to your Roblox homepage. Open the Settings again, but this time select the Privacy tab. Scroll to find the section titled Beta Features. Here, a toggle switch labeled Enable Voice Chat will appear. Slide it to the “on” position.
A confirmation pop-up may display, reminding users about community guidelines and the importance of respectful behavior. Agreeing to these terms finalizes activation. Voice chat becomes available for use in compatible experiences once settings are saved.
Not every Roblox game supports spatial audio. Game developers must opt in and enable voice functionality in their experiences. To determine whether voice chat works in a specific game, look for speaker icons above avatars or check the game’s description.
If available, simply join the game. Upon entering, ensure your microphone is active. A headset icon usually appears in the top-left corner or near the avatar profile in the player list. Speaking while the feature is active lets others nearby hear your voice.
Adjusting audio preferences enhances clarity. Open your system’s microphone settings to ensure the correct input device is selected. Roblox uses your default mic, so confirming this beforehand avoids technical issues mid-game.
Desktop users often benefit from higher-quality audio setups. USB microphones or gaming headsets generally provide clearer sound than built-in laptop mics. Choosing better equipment leads to more enjoyable conversations during play sessions.
Mobile players also have access, though microphone quality may vary. Ensure your device isn’t muted and has granted permission to access audio hardware. If the voice function doesn’t respond, revisit system app settings to confirm proper permissions.
Should other users struggle to hear you, verify the mute toggle isn’t accidentally active. Within the game interface, check for a microphone icon. If it’s crossed out or greyed, tap it once to re-enable speaking capability.
Safety remains a core priority. Roblox moderates voice communications using real-time detection tools. Abusive language, threats, or policy violations can result in removal from voice-enabled areas or full account suspension. Always speak responsibly.
You can control who interacts with you. Within the Privacy settings, adjust communication preferences to limit interactions. Choosing “Friends” instead of “Everyone” restricts voice chats to approved contacts only, reducing the chance of unwanted conversations.
If you ever want to disable the feature, simply return to the same Privacy menu. Toggle the Enable Voice Chat switch off. This action deactivates microphone transmission across all experiences instantly.
Parental controls offer an additional layer of protection. Guardians may activate a Parent PIN under Parental Controls to prevent voice chat activation. When enabled, the child’s account cannot modify privacy settings without entering the code.
For developers creating games, implementing voice features involves enabling the “Spatial Voice” checkbox in the game’s configuration panel. Once enabled, additional UI components and code options become available, allowing creators to control how and when players communicate.
In summary, turning on Roblox voice chat involves age verification, enabling the correct setting, and joining supported games. While the process may feel technical, it’s designed with safety and clarity in mind.
Voice communication brings players closer, enhances cooperation, and adds another layer of interactivity. Knowing how to configure and manage these tools ensures a smooth, secure, and enjoyable experience.